Homeowners don’t realize how much they depend on their sink until it’s clogged. When this plumbing fixture isn’t working, you can’t wash your hands, fruit, vegetables and dishes. Unfortunately, all households will deal with a clogged sink at some point. It happens when food particles, hair, soap scum, grease and other debris get stuck in the drain.
Getting out of this sticky situation doesn’t have to be complicated. Some DIY methods can help free up your sink and let the water drain again. If none of them work, it’s time to contact a professional plumber to come to your rescue. A licensed plumber has the tools and expertise to address any plumbing concern.
DIY Methods to Deal With a Clogged Sink Drain
The first step is to identify what type of clog you are dealing with. A kitchen sink clog is different from a bathroom sink clog. Kitchen sinks usually have a garbage disposal, and it might be causing the blockage.
Pour Boiling Water Down the Sink Drain
Boiling water might be all you need to unclog your sink. This method is perfect for homeowners with metal pipes, especially if you think grease, soap and hair are the culprits. However, do not try this if you have PVC pipes. To start, heat eight cups of water. Once boiling, pour the water down the drain. Afterward, turn on the faucet and check if water drainage has improved. You can repeat the process if you’re dealing with a stubborn blockage. Move on to other methods if you don’t notice a change.
Mix Baking Soda and Vinegar
A simple way to try to unclog a sink is to mix baking soda and vinegar. When combined, they make a powerful solution that can remove stubborn blockages. Start by pouring a cup of baking soda into the sink’s drain. Follow with a cup of vinegar and immediately cover the drain with the stopper. Let the mixture fizz for 15 minutes. Next, open the drain and turn on the hot water. If there’s an improvement, repeat the steps until the clog is gone.
Plunge Your Sink
If you think your plunger only works for toilet bowls, you might be surprised to learn that it can be effective for clogged sinks. If you prefer having a dedicated plunger for your kitchen or bathroom sink, you can purchase a miniature one specifically for blocked drains. To try this method, turn on the hot water and fill the sink halfway. Cover the drain with the plunger and pump it a few times. Next, remove the plunger and see if there’s an improvement in water drainage. Repeat the steps until the blockage is gone.
Clean the Sink Trap
If none of the other DIY methods work, it’s time to get under the sink and remove the sink trap. But a word of warning: This can get messy, so dress appropriately and have a bucket and newspapers nearby. Additionally, this fix is a bit more complicated and might be best left to a licensed plumber.
Remove the slip joints and clean the grime buildup in the sink trap. You can do this outside with your garden hose so you don’t mess up your kitchen or bathroom. Once it’s pristine, you can reattach it to the bottom of your sink.
If you’ve done everything you can, but the clog refuses to budge, that’s your cue to seek professional help. Professional plumbers will resolve the issue and have your sink draining again.

How to Unclog a Kitchen Sink With Standing Water
Any of your sinks at home can get clogged, but the one in your kitchen is the most susceptible to this issue. When it happens, cooking and cleaning become more stressful. If you have a clogged kitchen sink with standing water, there are some DIY methods you can try to solve the problem.
Remove the Clog by Hand
Start by taking a bucket and removing as much of the standing water as possible. Empty the water in a functional sink or a drain outside your home. Next, inspect the drain for any visible clogs. There might be food particles or a foreign object that’s blocking the drain. You can use a flashlight to help you see further down the pipe. If you spot the blockage, wear gloves, reach into the drain and pull it out with your hands. If that doesn’t improve drainage, something further down might be causing the clog. However, remember that if you have a garbage disposal, you should never put your hand down the drain.
Use a Plunger
If manual extraction doesn’t do the trick, try the plunger next. However, don’t attempt this method while there’s standing water in the sink. That will create a mess in your kitchen. Dump out as much of the water as possible first. If you have a double sink, plug the other drain to keep air from escaping. Next, place the plunger over the drain hole, ensuring it forms a tight seal. Pump it up and down at least five times without being too forceful. Detach the plunger and turn on the faucet. If the water still doesn’t drain, try another method.
Remove the P-Trap
If none of the other DIY methods removed your kitchen sink’s clog, your last resort is to detach and clean the P-trap, which is the P-shaped section of pipe that runs from the bottom of the sink to the wall. This can get messy and may be better handled by a plumber.
Start by emptying the sink of standing water. Next, place a bucket under the sink, loosen the nuts with pliers and remove the P-trap. Inspect it for dirt and debris buildup and remove any obstructions you find.
Turn on the faucet and check if the water drains. If it’s still not going down, it’s time to turn your kitchen sink over to the hands of a professional plumber. The plumber knows how to handle the most stubborn clogs and will return your sink to its effective draining state.
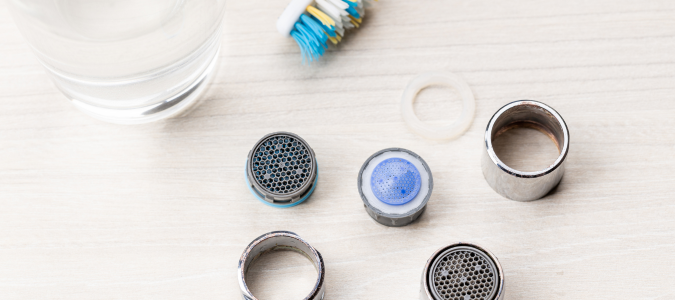
How to Clean a Sink Aerator
Sinks have tiny fittings called faucet aerators. Homeowners might not even notice they’re there. But they have a significant impact on the way water flows out of your faucet. Faucet aerators incorporate air into the water, creating a seamless stream. In addition, it restricts the amount of water that comes out. By injecting air and decreasing flow, it lowers your water consumption.
The bad news is mineral deposits can eventually clog your faucet aerator’s screen. That will cause your faucet to produce low water pressure in your kitchen sink and an inconsistent spray pattern. Fortunately, homeowners can easily clean their faucet aerators themselves. It’s a simple procedure that involves the following steps:
- Detach the aerator from the end of the faucet. Grip it tightly and rotate it clockwise. You can use tongue-and-groove pliers if it’s not budging. However, don’t apply too much pressure to avoid damaging the aerator’s exterior. If you want, you can protect it with a layer of masking tape.
- After removing the aerator, inspect for dirt and debris buildup. You can use a small screwdriver or something similar to scrape away the gunk.
- Rinse the aerator under running water to remove the remaining loose residue. Next, fill a container with white vinegar and let the aerator soak for thirty minutes.
- The last step is to get a toothbrush and scrub the aerator. The bristles will remove any dirt from the small holes. Rinse the aerator a final time to eliminate any dislodged gunk.
- Reassemble the aerator and attach it to the end of the faucet.
Contact a Professional If You’re Dealing With a Clogged Sink Drain
While there are several DIY methods for unclogging sinks, they don’t always work. If you’ve exhausted all your DIY skills, it’s time to let a professional plumber take over. The plumber will assess the issue and provide an effective solution so your sink will work again. They can also help with any other plumbing issues you may be having, for example if your dishwasher is back up into the sink.
ABC Can Help With Your Clogged Sink Drain
When dealing with plumbing problems, it’s not worth making a mess yourself. Instead of trying to learn the ins and outs of plumbing, contact ABC Home & Commercial Services. Our licensed professionals can efficiently diagnose and repair any plumbing issue you may have, like a main drain that keeps clogging.